
Everything you need to successfully plan, execute, and analyze your RNA Flow Assays.
Step-by-step guide for your RNA Flow experimental success.
Download Dahlia RNA Flow User Guide
Collect 1×10⁶ cells per test for RNA detection or 2×10⁶ cells per test for antibody co-staining.
Perform antibody co-staining using recommended fluorophore conjugates to correlate surface protein marker expression with target RNA transcript levels.
Fix and permeabilize cells with 1.6% PFA solution and methanol. Potential pause point: Store cells in methanol at -80°C for up to 6 months.
Prepare buffers and probe hybridization reactions. Apply RNA Flow Probes and incubate at 45°C for 1 hour. Wash with various buffers optimized for high stringency.
Add amplification enzyme to amplify target-specific signal and boost detection sensitivity of RNA targets. Potential pause point: Store cells in dark, refrigerated conditions (4°C) overnight.
Stain cells with fluorescent target-specific detection probes, wash, and resuspend cells.
Analyze samples using standard flow cytometers equipped with appropriate lasers (488nm, 561nm, 633nm). Set PMT voltages using unstained and single-color controls to optimize signal resolution and compensation.
Export FCS files to your preferred flow analysis software (e.g., FlowJo, FCS Express) to quantify RNA-positive cell populations and mean fluorescence intensity.
Download Dahlia RNA Flow User GuideA practical guide for planning for your RNA Flow experiments
Dahlia RNA Flow Assays are built for ultra-throughput, multi-color single-cell RNA analysis using standard flow cytometers.
Antibody-based detection only works if a good antibody exists for your target. For a lot of biology, it does not. RNA detection sidesteps that problem entirely, since you can design assays for almost any transcript. We will work with you on any target and will wet-lab-validate within 3 weeks of order.
That said, RNA detection isn't a drop-in replacement for antibody-based protein detection. Detecting RNA requires a highly sensitive approach such as Dahlia RNA Flow Assays because RNA copies per cell are typically 100- to 10,000-fold lower in target abundance than cell surface proteins commonly stained with antibodies. The best approach is often knowing when to use each and with Dahlia RNA Flow Assays, you can use antibody co-staining and RNA detection together.
Not every transcript is a good RNA Flow candidate. Target selection makes or breaks your results. Start with biological relevance: is this target actually informative for your question, or just convenient?
Next, check expected target abundance using an orthogonal method before you commit.
Have qPCR data? Compare your target RNA’s relative expression to GAPDH (or another stable housekeeping gene). As a general starting point, target RNAs within 10-fold of GAPDH are typically good candidates for RNA Flow detection; anything much further behind may fall below reliable detection sensitivity.
Have scRNA-seq data? Check the percentage of cells expressing your target in a relevant scRNAseq dataset. The Allen Institute's single-cell atlases are a great free resource. Target RNAs expressed in >5% of your population of interest are generally a good threshold
Good controls are what separate a convincing result from a maybe. Before you run your real samples, build in both biological and assay-level controls.
Biological controls confirm your experimental system is behaving as expected: stimulated vs. untreated samples, plus known positive and negative populations for your targets of interest.
Assay controls confirm the kit itself is working, independent of your biology. For positive controls, use a reliably expressed transcript. We have found MALAT1 works well in PBMCs and GAPDH in most cell lines. For negative controls, include an unstained sample, a detection-only sample (no probe), and a non-targeting probe like Lambda2 (phage) to establish background signal.
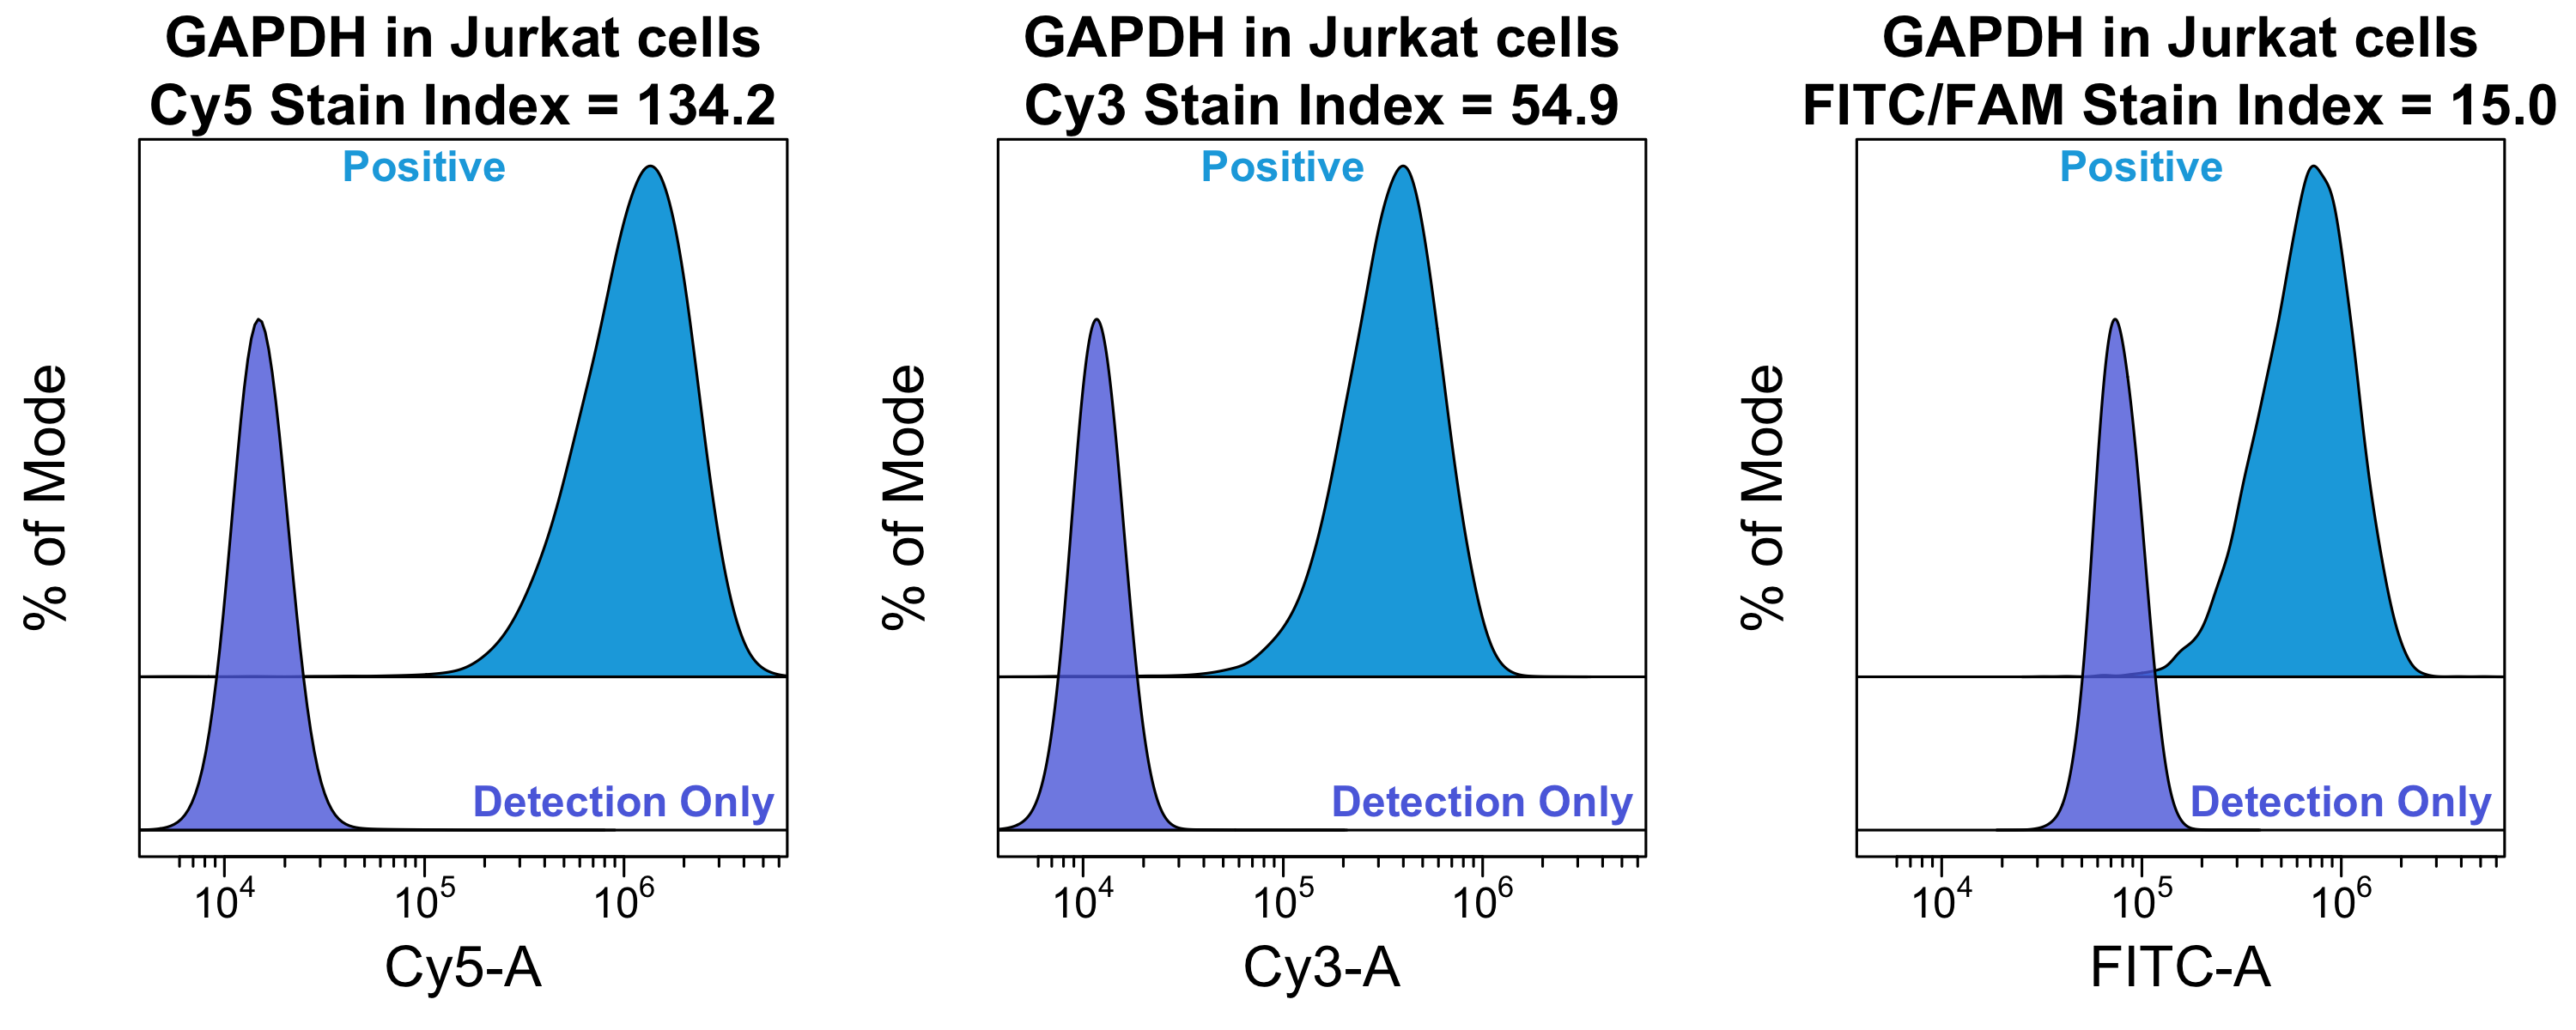
Dahlia RNA Flow Assays support multiplexing up to three RNA targets in a single run. Though, channel assignment matters. The three probe channels differ in relative brightness (Cy5 > Cy3 > FITC) (see Figure below so matching target abundance to channel brightness is key to getting clean data across all three. Relative to Cy5, Cy3 has ~75% of the brightness whereas FITC has approximately a third.
As a general rule: assign FITC to your most abundant positive control (e.g. MALAT1 in PBMCs, GAPDH in cell lines), and Cy3 and Cy5 to your lowest abundant targets.
If you're co-staining with antibodies, factor in fluorophore compatibility across your full panel, not just the RNA channels. We also recommend standard flow panel-building principles and practices: check spectral overlap, confirm your instrument's laser/detector configuration supports your chosen fluorophores, and plan for compensation or spectral unmixing controls (single-stain and FMO controls) from the start.
Your sample matters as much as your target selection. Cell lines and PBMCs (and even activation state) will behave differently under the assay's fixation and permeabilization steps. Before you fix anything, check cell health: low viability going in almost always means low signal (or high background) coming out.
Confirm you're starting with enough cells to survive the multiple wash/spin steps in the protocol and still have sufficient events for reliable flow analysis. Our recommendation is 250K cells per test. In order to have sufficient cells, we recommend starting with 1M cells per test for RNA detection only experiments and 2M cells per test for antibody co-staining.
Before committing to your full experiment, run a small pilot to make sure everything, your instrument, your protocol execution, and your known low risk samples are behaving as expected.
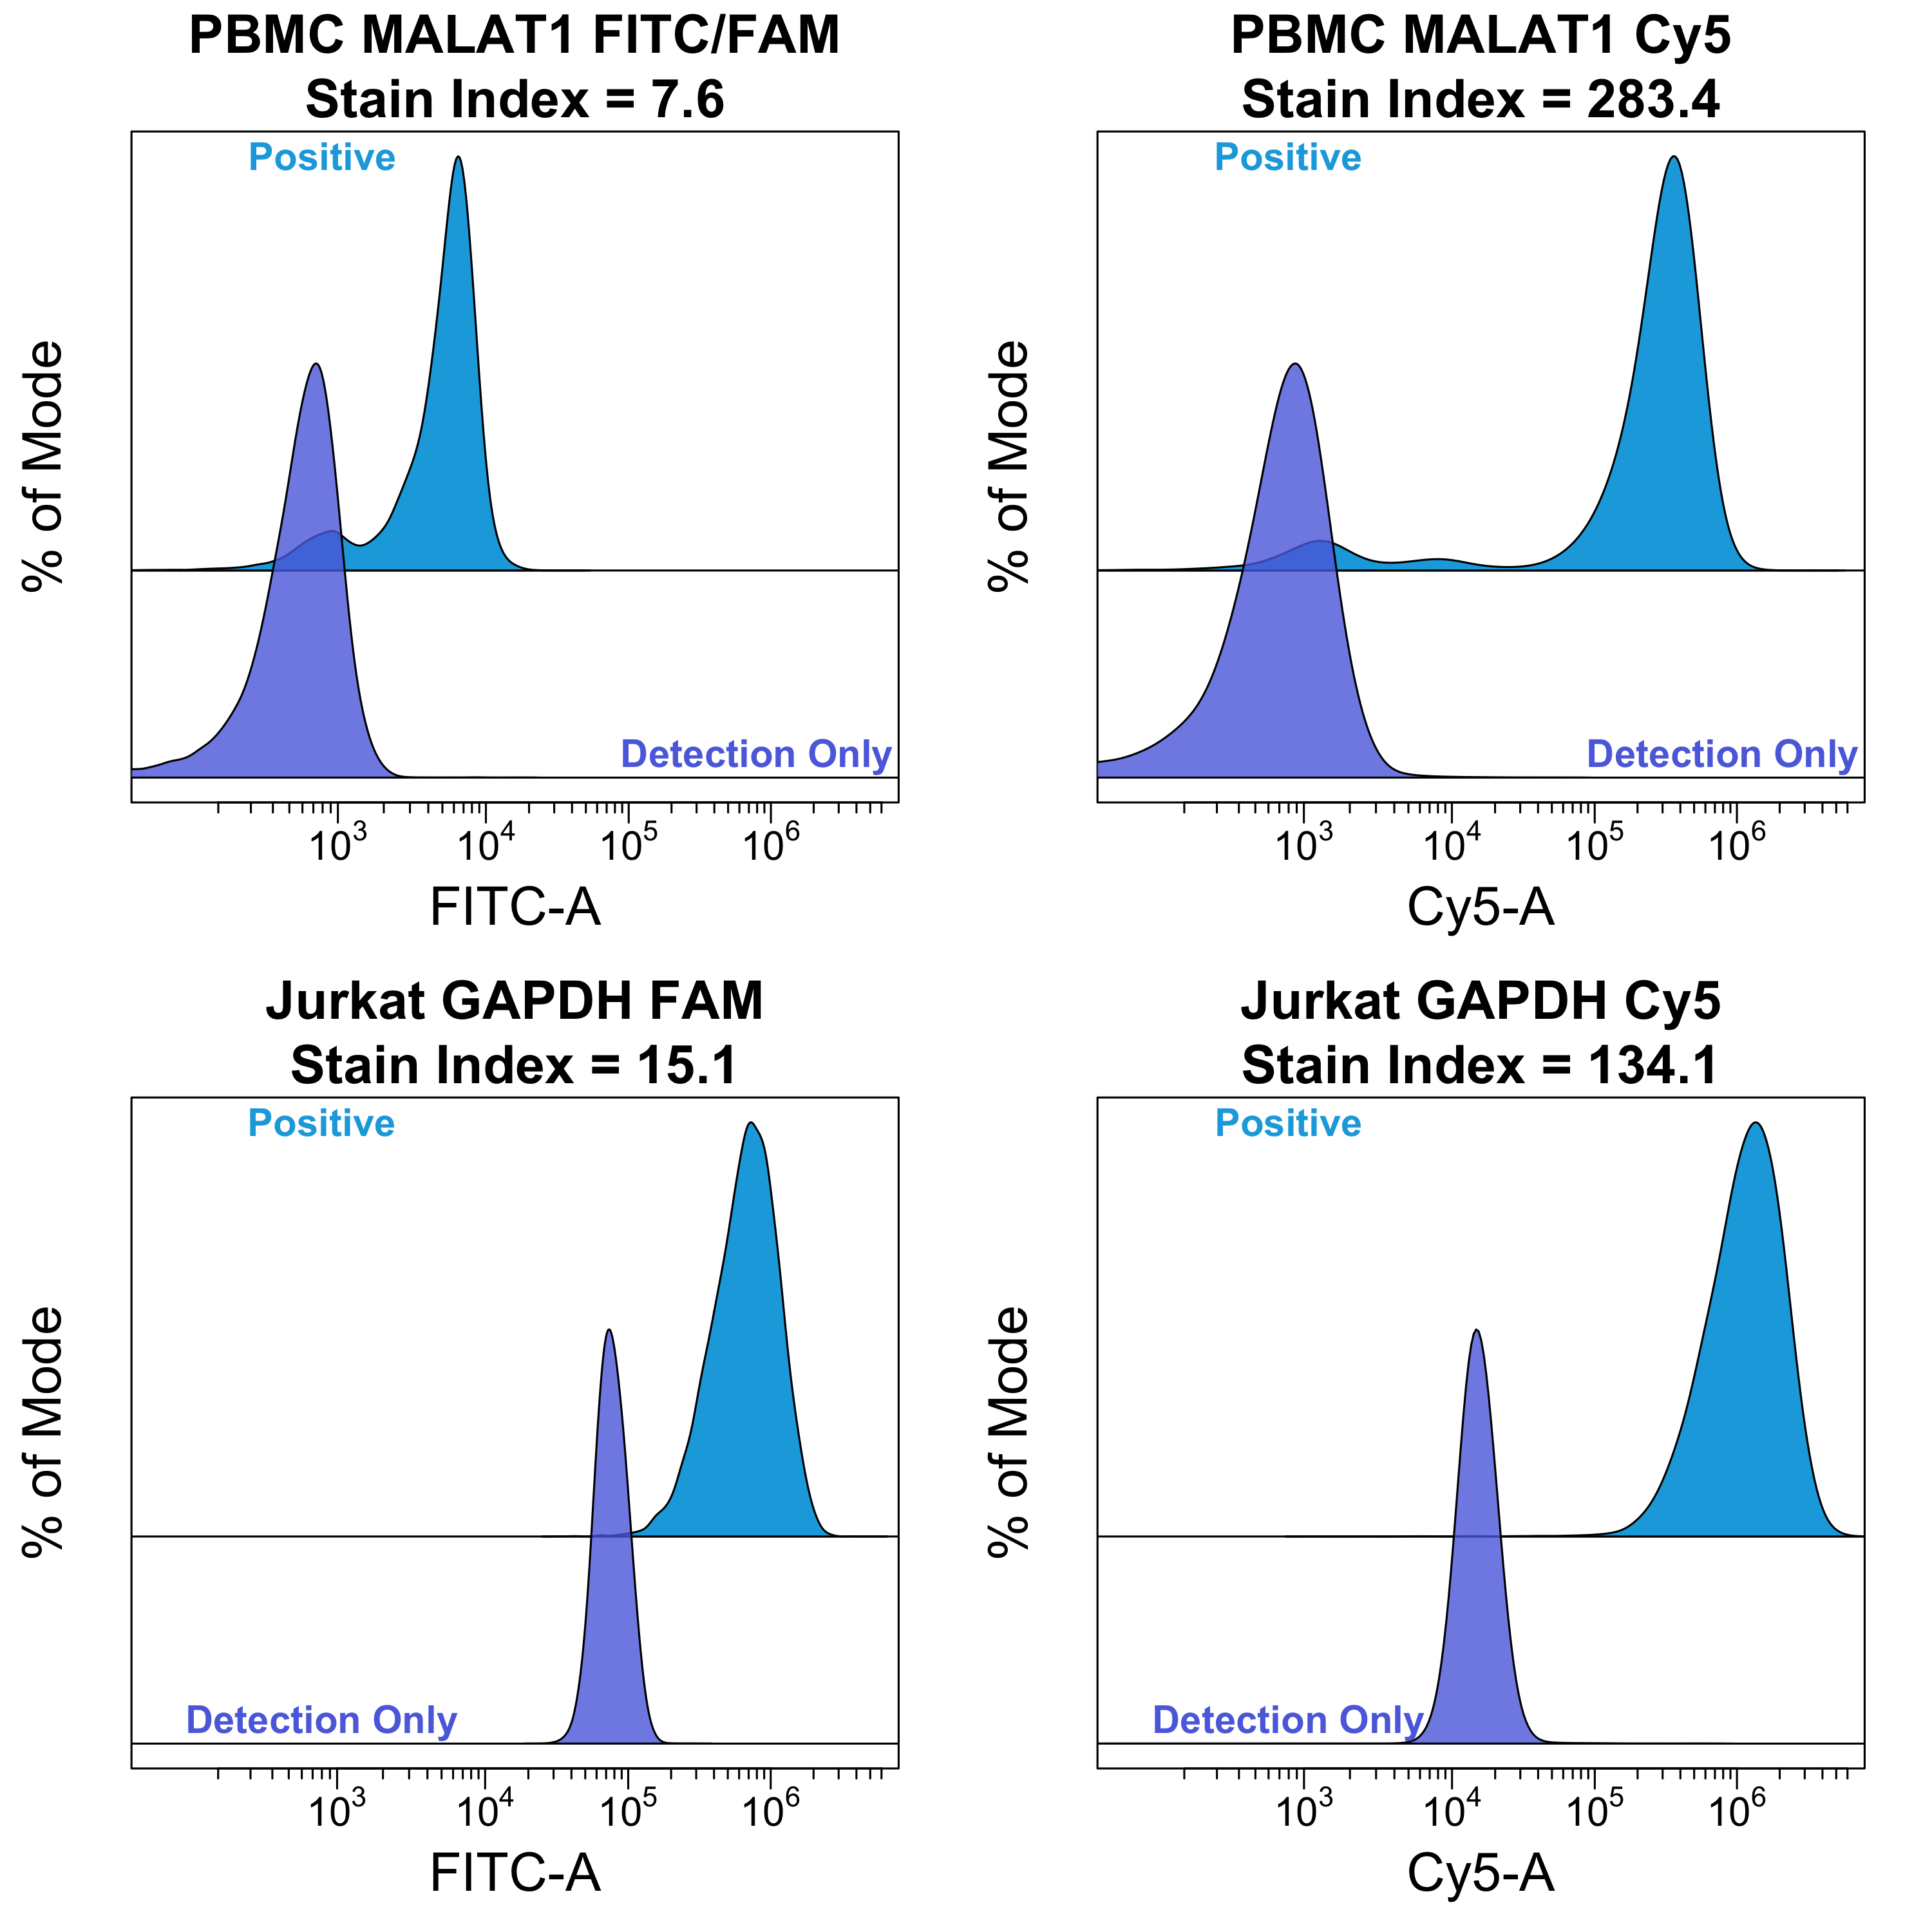
Start by setting voltages on your flow cytometer, then run your positive and negative controls in the actual cell type you'll be using (e.g., GAPDH in your cell line of interest). Compare your stain index against Dahlia's representative data (see Figure below). If you are multiplexing, we recommend that you use the FITC channel for your high expression positive control target (GAPDH in cell lines, MALAT1 in PBMCs). A stain index in the expected range confirms your cytometer is properly qualified and your protocol was executed correctly. If it's off, better to catch it here than after your full dataset is in.
Once controls check out, your small-scale pilot study is ready to run! We suggest a limited number of RNA targets, a subset of your samples, with full controls (positive, negative, an unstained s, and a detection only splicaes included where appropriate. This is also a great place to nail down experimental timing and familiarize yourself with the protocol.
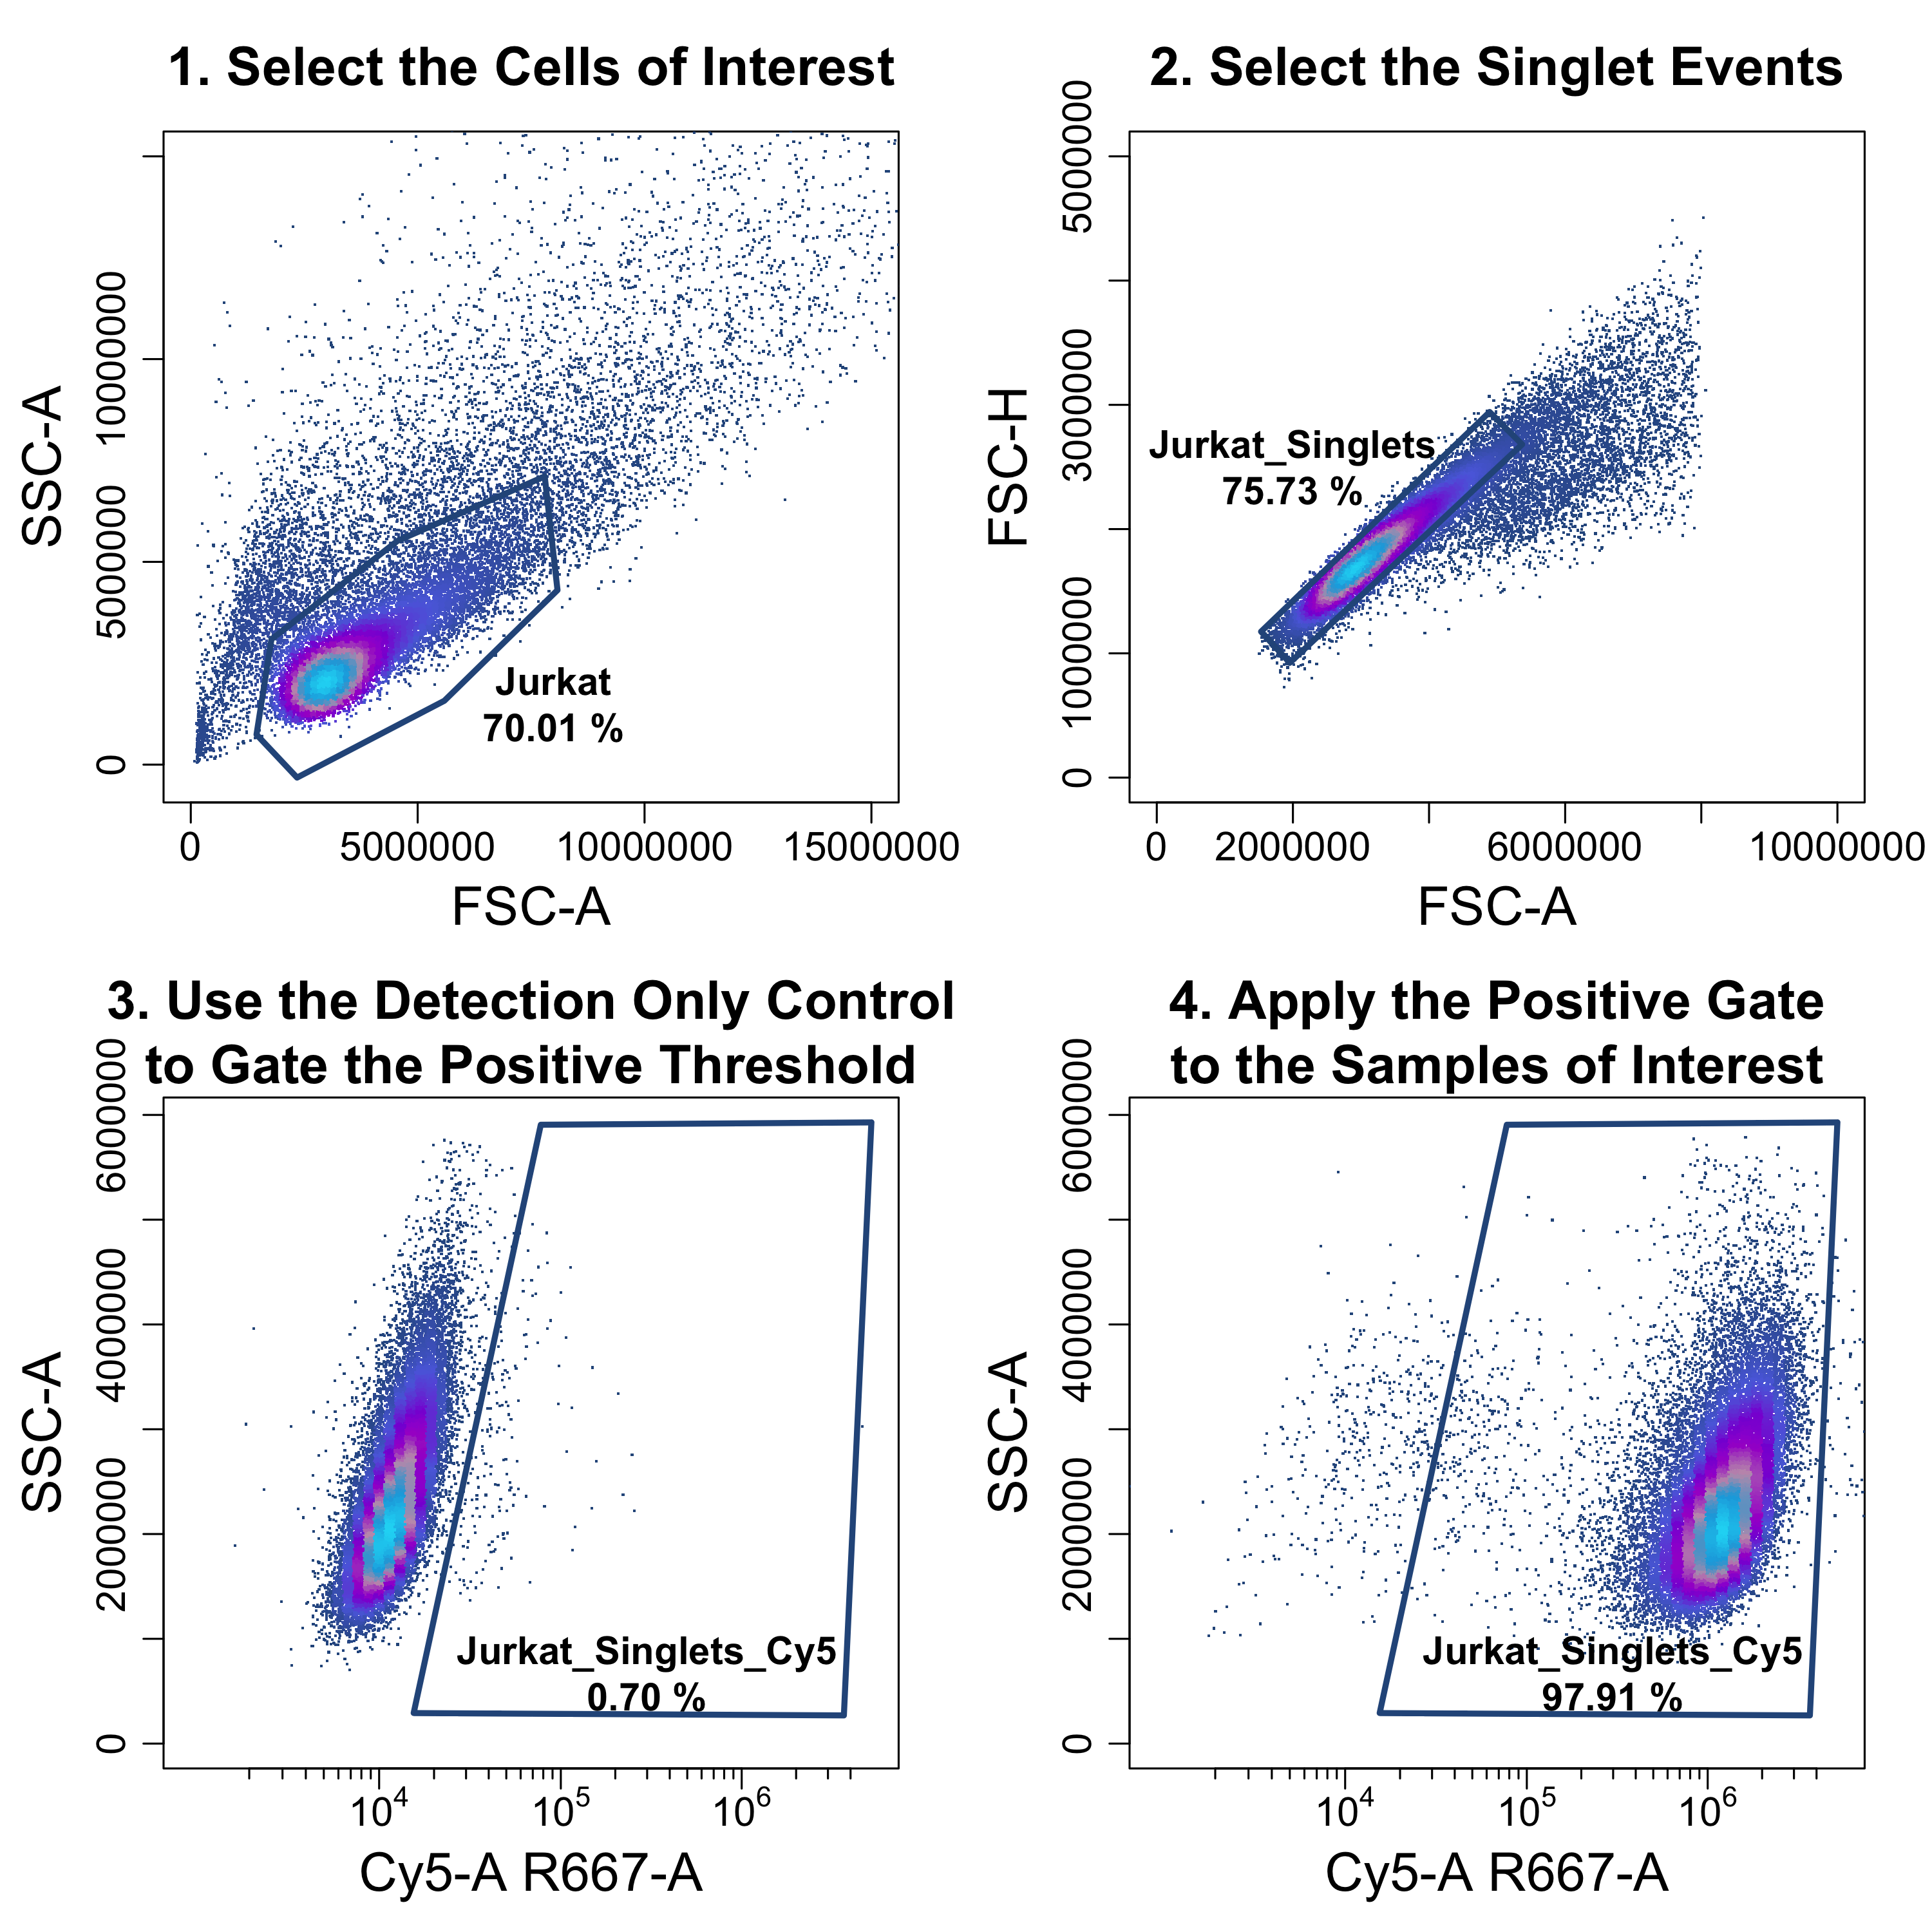
A consistent gating strategy is what makes your RNA Flow data interpretable and comparable across samples and runs. Start with your standard gates (debris exclusion, singlets, live/dead if included), then gate on your assay controls first: confirm your positive control population resolves clearly from your negative/unstained control before gating on your actual targets of interest.From there, apply the same gating logic to your target RNA channels, using your negative control (e.g., Lambda2) to set your positive/negative threshold.
Great RNA Flow data isn't the result of a single decision. It's the sum of a lot of small ones made early: the right targets, the right controls, a panel built around real fluorescence intensity, samples handled consistently, and a pilot run that catches problems before they show up in your full dataset.
None of this has to happen alone. Whether you're validating a new target, troubleshooting an unexpected result, or just want a second set of eyes on your panel design before you order, our team is here to help.
Ready to plan your first experiment? Reach out to our team or download our full experimental User Guide to get started!
Common questions about assay chemistry, compatibility, and troubleshooting.
Yes, our protocol is compatible with surface antibody co-staining. We recommend the use of fluorochromes that are known to be methanol resistant. Choose small molecule fluorophores (Alexa Fluor dyes, Brilliant Violet dyes, Starbright dyes). Avoid protein-based fluorochromes such as APC, PE, and PerCP and their respective tandems.
No. We have validated our protocol with 1.6% PFA fixation and ice-cold methanol permeabilization. Using a higher percentage of PFA will result in decreased sensitivity.
We have validated our protocol with PBMCs, suspension cell lines (e.g. Jurkat), and adherent cell lines (e.g. HELA).
We have not validated our protocol with nuclei.
We recommend starting with 2M cells/test with antibody co-staining and 1M cells/test with RNA detection only protocol.
Yes, you can scale the volumes of the fix/perm reagents depending upon the total number of cells. After permeabilization in methanol, cells are stable at -80℃ for up to 6 months.
As a general rule: assign FITC to your most abundant positive control target (e.g. MALAT1 in PBMCs, GAPDH in cell lines) and Cy3 and Cy5 to your lower abundance targets. Note: Cy3 is ~75% of the brightness relative to Cy5.
After staining, you can store resuspended cells in Wash Buffer C at 4oC for up to a week before flow cytometry analysis.
We have validated our protocol with 96-well V-bottom plates (USA Scientific, cat. # 1833-9610). We recommend a small pilot study with your specific reaction vessels prior to scaling your experiment. ce-based flow cytometers with standard laser configurations.
To discard supernatant from the wells, the plate may be inverted, using a single motion with adequate force ("flicking"). Alternatively, aspiration may be used, being careful to not disrupt the pellet.
Our preferred target sequence length is at least 1 kb. However, we can design assays for target sequences as short as 50 nt, however there is risk of sub-optimal sensitivity and specificity depending on target sequence and RNA expression levels.
6 months.
The 10X RNAse Inhibitor will arrive frozen on dry ice. Upon use, it will be heated at 65oC for 15 minutes before it is added to buffers. We recommend aliquoting the 10X RNAse Inhibitor upon first thaw for future experiments if you don’t plan to use the full kit to mitigate freeze thaw cycles.
Fixed and permeabilized cells stored in methanol can be placed on ice during the initial cell resuspension and distribution into wells.